How to Repair a Chimney Cap
A Comprehensive Step-by-Step Guide
Introduction
Your chimney cap is a critical component of your home’s chimney system, acting as a protective barrier against water, debris, and animals. When a chimney cap deteriorates, it can lead to water infiltration, structural damage, and costly repairs. Regular maintenance and timely repairs can prevent these issues, saving you time and money while extending the life of your chimney. This comprehensive guide will walk you through the process of repairing a chimney cap, with detailed steps, practical tips, and safety considerations to ensure a successful DIY project.
Given your previous interest in home improvement topics like roof ventilation, this guide aligns with your focus on maintaining a well-functioning home exterior. Let’s dive into the tools, materials, and steps needed to restore your chimney cap to top condition.
Tools & Materials Needed
To repair a chimney cap effectively, gather the following tools and materials:
- Chisel: A sturdy chisel is essential for removing loose or damaged concrete from the chimney cap.
- Wire brush: Use this to scrub away debris, dust, and loose particles for a clean surface.
- Trowel: A flat trowel is ideal for applying and smoothing the concrete patcher.
- Safety gear: Protect yourself with heavy-duty gloves, safety goggles, and a dust mask to avoid inhaling concrete dust or debris.
- Quikrete Vinyl Concrete Patcher: This ready-to-use product (available in a yellow bag) is designed for strong adhesion and durability, making it perfect for chimney repairs.
- Sealant: Choose a high-quality, weather-resistant sealant to protect the repaired cap from moisture and harsh weather.
- Bucket and mixing tool: For preparing the concrete patcher, if not using the pre-mixed version.
- Spray bottle or damp cloth: To lightly wet the surface before applying the patcher.
- Ladder or scaffolding: Ensure safe access to the chimney, depending on your roof’s height and pitch.
- Drop cloth or tarp: To protect the area below the chimney from falling debris.
Pro Tip: Double-check that your ladder is stable and rated for your weight, and always have someone nearby for safety when working at heights.
Step-by-Step Process
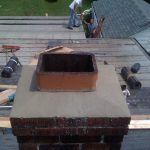
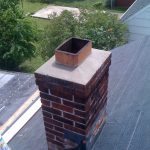
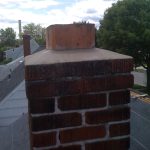
1. Inspection
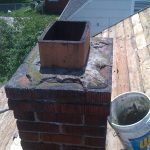
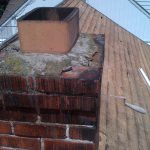
Begin by thoroughly inspecting the chimney cap to assess its condition. Climb onto the roof (safely, using a secure ladder) and examine the cap for:
- Cracks: Hairline or larger cracks in the concrete.
- Chips or spalls: Areas where the concrete has broken away.
- Erosion: Signs of weathering or material loss due to exposure.
- Flue condition: Check the flue liner for cracks or damage, as it works in tandem with the cap to protect the chimney.
Take note of all damaged areas. If the flue is intact, you can proceed with the repair. However, if the flue is severely cracked or crumbling, consider replacing it before repairing the cap, as a damaged flue can compromise the entire chimney system. For complex flue repairs, consult a professional chimney sweep or mason.
Safety Note: Avoid working on the roof during wet, windy, or icy conditions to prevent slips and falls.
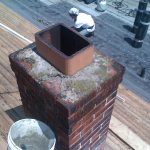
2. Removal
Once you’ve identified the damaged areas, use a chisel to carefully chip away loose or crumbling concrete. Follow up with a wire brush to scrub off any remaining loose particles, dust, or debris. This step is crucial, as any loose material left behind can weaken the bond of the new concrete patcher.
Be methodical and patient—rushing this step could lead to an uneven repair or poor adhesion. If you encounter stubborn debris, use the wire brush with a bit more pressure, but avoid damaging the underlying structure.
3. Cleaning
A clean surface is essential for a strong repair. After removing loose material, thoroughly clean the chimney cap to eliminate dust, dirt, and any remaining debris. You can:
- Use a wire brush to scrub the surface again.
- Wipe the area with a damp cloth or sponge.
- Rinse lightly with water, ensuring not to soak the bricks or concrete excessively.
Allow the surface to dry slightly, but keep it lightly damp for the next step (see the pro tip below). A clean, properly prepped surface ensures the Quikrete Vinyl Concrete Patcher adheres effectively.
4. Mixing & Application
Mixing
The Quikrete Vinyl Concrete Patcher is an excellent choice for chimney cap repairs due to its durability, ease of use, and strong bonding properties. If you’re using the ready-to-use version, you can skip mixing. For the dry mix:
- Pour the patcher into a clean bucket.
- Add water according to the package instructions (typically a small amount to achieve a thick, workable consistency).
- Mix thoroughly with a trowel or mixing tool until smooth and free of lumps.
Pro Tip: Lightly wet the top of the bricks or concrete surface with a spray bottle or damp cloth after cleaning. This prevents the dry surface from absorbing moisture from the concrete mix, which can weaken the repair and cause cracking.
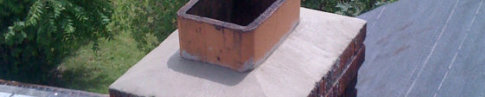
Application
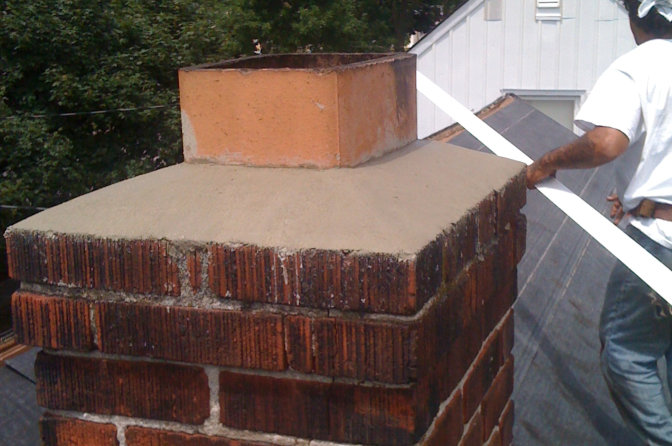
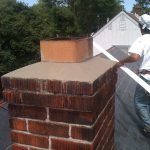
Using a trowel, apply the concrete patcher to the damaged areas of the chimney cap. Follow these tips for a professional finish:
- Work in layers: If the damaged area is deep, apply the patcher in thin layers (about 1/4 inch thick), allowing each layer to set slightly before adding the next.
- Smooth the surface: Use the trowel to create a smooth, even surface, blending the patcher with the existing concrete.
- Ensure proper pitch: The chimney cap should slope slightly (about 15–30 degrees) to allow water to run off and prevent pooling. Use the trowel to shape the patcher accordingly.
- Check for gaps: Press the patcher firmly into cracks and voids to eliminate air pockets.
Take your time to achieve a uniform appearance. If you’re new to troweling, practice on a small area first to get a feel for the material.
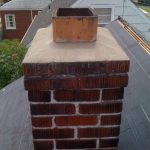
5. Curing & Sealing
Allow the concrete patcher to cure fully, which typically takes 24–48 hours, depending on the weather and the product’s instructions. During this time:
- Protect the repair: Cover the chimney cap with a tarp or plastic sheeting if rain is expected, as moisture can interfere with curing.
- Avoid touching: Don’t disturb the surface while it sets to ensure a strong bond.
Once the patcher is fully cured, apply a high-quality, weather-resistant sealant to the repaired area. Use a brush or roller to coat the entire cap evenly, paying extra attention to the repaired sections. The sealant adds a protective barrier against water, UV rays, and freeze-thaw cycles, significantly extending the life of your repair.
Optional: For added durability, consider applying a second coat of sealant after the first has dried (check the product’s instructions for drying times).
Additional Tips for Success
- Regular maintenance: Inspect your chimney cap annually, especially after harsh winters or storms, to catch small issues before they become major problems.
- Weather considerations: Choose a dry, mild day for the repair (ideally 50–80°F) to ensure proper curing and adhesion.
- Creative design elements: If you’re interested in aesthetics (as you were with roof ventilation designs), consider shaping the chimney cap with a subtle decorative edge or texture during the application step, as long as it maintains the necessary pitch for water runoff.
- When to call a pro: If the damage is extensive, involves structural issues, or requires flue replacement, hire a certified chimney professional to ensure safety and compliance with local building codes.
Conclusion
A well-maintained chimney cap is your first line of defense against water damage, animal intrusion, and chimney deterioration. By following this detailed guide, you can repair your chimney cap with confidence, preventing costly repairs and prolonging the life of your chimney. Regular inspections, timely repairs, and proper sealing will keep your chimney in top condition for years to come.
This project is a manageable DIY task for homeowners with basic skills, especially if you’re already comfortable tackling home improvement projects like roof ventilation. With the right tools, materials, and a bit of patience, your chimney cap will be as good as new, protecting your home and enhancing its durability
0/5
(0 Reviews)